本页显示内容多来源于网络,再次记录备忘!
注:博客使用 Hugo 构建,主题 Stack 由 Jimmy 设计。
🚗 页面底栏添加“网站运行时长”
<效果展示>

在layouts/partials/footer/custom.html里添加以下JS代码,其中s1是网站创建日期。代码参考自这里 ,加上了小时和分钟的计算。
 1
 2
 3
 4
 5
 6
 7
 8
 9
10
11
12
13
14
|
    <!-- Add blog running time -->
    <script>
        let s1 = '2023-3-18'; //website start date
        s1 = new Date(s1.replace(/-/g, "/"));
        let s2 = new Date();
        let timeDifference = s2.getTime() - s1.getTime();

        let days = Math.floor(timeDifference / (1000 * 60 * 60 * 24));
        let hours = Math.floor((timeDifference % (1000 * 60 * 60 * 24)) / (1000 * 60 * 60));
        let minutes = Math.floor((timeDifference % (1000 * 60 * 60)) / (1000 * 60));

        let result = days + "天" + hours + "小时" + minutes + "分钟";
        document.getElementById('runningdays').innerHTML = result;
    </script>
|
再在layouts/partials/footer/footer.html里添加以下代码:
1
2
3
4
5
|
    <!-- Add blog running time -->
    <section class="running-time">
    本博客已稳定运行
    <span id="runningdays" class="running-days"></span>
    </section>
|
在assets/scss/partials/footer.scss里添加风格样式,这里单独把计时的部分加粗,并改了颜色。
1
2
3
4
5
6
7
8
9
|
    .running-time {
        color: var(--card-text-color-secondary);
        font-weight: normal;

        .running-days {
            font-weight:bold;
            color: var(--emphasize-text-color);
        }
    }
|
上面的计时部分设置成var(–emphasize-text-color),这样能比较方便地在assets/scss/variables.scss里设置暗色模式的颜色
1
2
3
4
5
6
7
|
    --accent-color-text: #fff;
    --body-text-color: #b0b0b0;
    --emphasize-text-color: #9e8f9f; // Add emphasize font color

    &[data-scheme="dark"] {
    --emphasize-text-color: #d5cfc4; // Add emphasize font color for dark scheme
    }
|
🚕 网站“文章数量”及“全站字数”统计
<效果展示>

在layouts/partials/footer/footer.html里增加以下代码,其中文章篇数统计参考了这篇,字数统计的展示方式参考了小球飞鱼的博客。
1
2
3
4
5
6
7
8
9
|
    <!-- Add total page and word count time -->
    <section class="totalcount">
        {{$scratch := newScratch}}
        {{ range (where .Site.Pages "Kind" "page" )}}
        {{$scratch.Add "total" .WordCount}}
        {{ end }}
        发表了{{ len (where .Site.RegularPages "Section" "post") }}篇文章 ·
        总计{{ div ($scratch.Get "total") 1000.0 | lang.FormatNumber 2 }}k字
    </section>
|
在assets/scss/partials/footer.scss里修改风格:
1
2
3
4
5
|
    .totalcount {
        color: var(--card-text-color-secondary);
        font-weight: normal;
        margin-bottom: 5px;
        }
|
🛺 首页添加“欢迎横幅”
<效果展示>

在博客根目录下的assets下创建一个名为scss的文件夹,然后在scss文件夹里创建一个名为custom.scss的文件,最终效果为~blog/assets/scss/custom.scss
先在博客的根目录下新建一个文件夹名为layouts(默认生成站点时也生成了,没有的话手动创建),之后将~\blog\themes\hugo-theme-stack\layouts\index.html下的文件复制到刚刚创建的layouts文件夹里,这意味着主题根目录下的layouts文件夹里的index.html将覆盖原主题目录下对应的文件,然后我们再复制出来的index.html中添加以下内容:
 1
 2
 3
 4
 5
 6
 7
 8
 9
10
11
12
13
14
15
16
17
18
19
20
21
22
23
24
25
26
27
28
|
    <!-- ~\site\blog\layouts\index.html -->
    ......
        {{ $filtered := ($pages | intersect $notHidden) }}
        {{ $pag := .Paginate ($filtered) }}
    <!-- 上面是主题自带的,只展示一部分,其余省略 -->
    <!-- ---这是我们添加进去的--------- -->
    <!-- 首页欢迎字幅板块 -->
    <div class="welcome">
      <p style="font-size: 2rem; text-align: center; font-weight: bold">
        <span class="shake">👋</span>
        <span class="jump-text1" > Welcome</span>
        <span class="jump-text2"> To </span>
        <span class="jump-text3" style="color:#e99312">L1</span><span class="jump-text4" style="color:#e99312">n</span
        ><span class="jump-text5" style="color:#e99312">Sn</span><span class="jump-text6" style="color:#e99312">0</span
        ><span class="jump-text7" style="color:#e99312">w</span>
        <span class="jump-text8" style="color:#e99312">'s</span>
        <span class="jump-text9" style="color:#e99312">Blog</span>
      </p>
    </div>
    <!-- ------首页欢迎字幅板块------ -->
    <!-- 下面也是主题自带的,只展示一部分,其余省略 -->

      <section class="article-list">
        {{ range $index, $element := $pag.Pages }}
        {{ partial "article-list/default" . }}
        {{ end }}
      </section>
    ......
|
接下来我们给欢迎横幅添加一些样式,回到原来创建的custom.scss中,在文件中写入以下内容
  1
  2
  3
  4
  5
  6
  7
  8
  9
 10
 11
 12
 13
 14
 15
 16
 17
 18
 19
 20
 21
 22
 23
 24
 25
 26
 27
 28
 29
 30
 31
 32
 33
 34
 35
 36
 37
 38
 39
 40
 41
 42
 43
 44
 45
 46
 47
 48
 49
 50
 51
 52
 53
 54
 55
 56
 57
 58
 59
 60
 61
 62
 63
 64
 65
 66
 67
 68
 69
 70
 71
 72
 73
 74
 75
 76
 77
 78
 79
 80
 81
 82
 83
 84
 85
 86
 87
 88
 89
 90
 91
 92
 93
 94
 95
 96
 97
 98
 99
100
101
102
103
104
105
106
107
108
109
110
111
|
    //  ~\blog\assets\scss\custom.scss

    //---------------------------------------------------------
    //首页欢迎板块样式
    .welcome {
      color: var(--card-text-color-main);
      background: var(--card-background);
      box-shadow: var(--shadow-l2);
      border-radius: 30px;
      display: inline-block;
    }

    // 👋emoji实现摆动效果
    .shake {
      display: inline-block;
      animation: shake 1s;
      animation-duration: 1s;
      animation-timing-function: ease;
      animation-delay: 0s;
      animation-iteration-count: 1;
      animation-direction: normal;
      animation-fill-mode: none;
      animation-play-state: running;
      animation-name: shake;
      animation-timeline: auto;
      animation-range-start: normal;
      animation-range-end: normal;
      animation-delay: 2s;
      @keyframes shake {
    0% {
      transform: rotate(0);
    }
    25% {
      transform: rotate(45deg) scale(1.2);
    }
    50% {
      transform: rotate(0) scale(1.2);
    }
    75% {
      transform: rotate(45deg) scale(1.2);
    }
    100% {
      transform: rotate(0);
    }
      }
    }
    // 实现字符跳动动画
    .jump-text1 {
      display: inline-block;
      animation: jump 0.5s 1;
    }

    .jump-text2 {
      display: inline-block;
      animation: jump 0.5s 1;
      animation-delay: 0.1s;
    }

    .jump-text3 {
      display: inline-block;
      animation: jump 0.5s 1;
      animation-delay: 0.2s;
    }

    .jump-text4 {
      display: inline-block;
      animation: jump 0.5s 1;
      animation-delay: 0.3s;
    }

    .jump-text5 {
      display: inline-block;
      animation: jump 0.5s 1;
      animation-delay: 0.4s;
    }

    .jump-text6 {
      display: inline-block;
      animation: jump 0.5s 1;
      animation-delay: 0.5s;
    }

    .jump-text7 {
      display: inline-block;
      animation: jump 0.5s 1;
      animation-delay: 0.6s;
    }

    .jump-text8 {
      display: inline-block;
      animation: jump 0.5s 1;
      animation-delay: 0.7s;
    }

    .jump-text9 {
      display: inline-block;
      animation: jump 0.5s 1;
      animation-delay: 0.9s;
    }

    @keyframes jump {
      0% {
    transform: translateY(0);
      }
      50% {
    transform: translateY(-20px);
      }
      100% {
    transform: translateY(0);
      }
    }
|
🚙 修改“归档页面为双栏显示”
<效果展示>

在custom.scss文件中添加以下内容:
 1
 2
 3
 4
 5
 6
 7
 8
 9
10
11
12
13
14
15
16
17
18
19
20
21
22
|
    //  ~\blog\assets\scss\custom.scss

    //--------------------------------------------------
    //归档页面双栏
    /* 归档页面两栏 */
    @media (min-width: 1024px) {
      .article-list--compact {
        display: grid;
        grid-template-columns: 1fr 1fr;
        background: none;
        box-shadow: none;
        gap: 1rem;

        article {
          background: var(--card-background);
          border: none;
          box-shadow: var(--shadow-l2);
          margin-bottom: 8px;
          border-radius: 16px;
        }
      }
    }
|
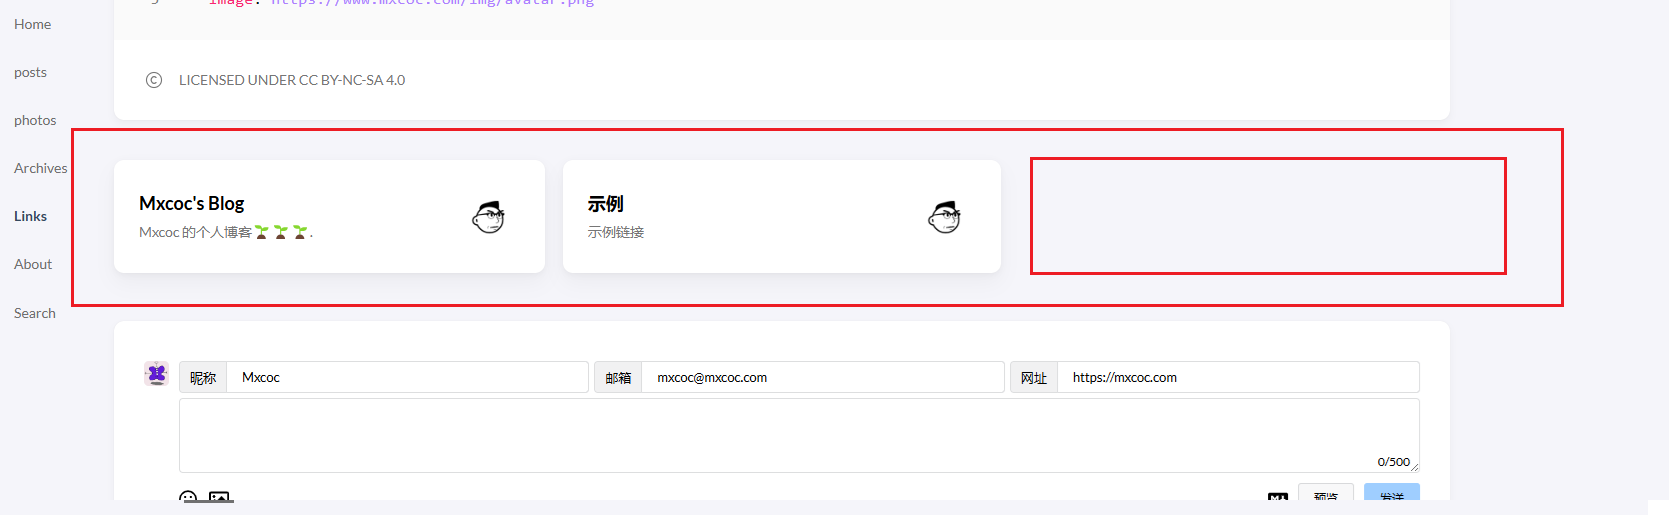
🛻 修改“链接页面为三栏样式”
<效果展示>
在custom.scss中写入以下内容:
 1
 2
 3
 4
 5
 6
 7
 8
 9
10
11
12
13
14
15
16
17
18
19
20
21
22
23
24
25
26
|
    //  ~\blog\assets\scss\custom.scss

    //--------------------------------------------------
    //链接三栏
    @media (min-width: 1024px) {
      .article-list--compact.links {
        display: grid;
        grid-template-columns: 1fr 1fr 1fr; //三个1fr即为三栏,两个1fr则为双栏,以此类推即可.
        background: none;
        box-shadow: none;
        gap: 1rem;

        article {
          background: var(--card-background);
          border: none;
          box-shadow: var(--shadow-l2);
          margin-bottom: 8px;
          border-radius: var(--card-border-radius);

          &:nth-child(odd) {
            margin-right: 8px;
          }
        }
      }
    }
|
🚜 Hugo 添加 Google Analytics
(2024.08.11.22.40)
修改 config.yaml 配置文件,在文件末尾添加以下代码:
1
2
3
|
    services:
      googleAnalytics:
    ID: G-JQN2M0MC5N # Enable Google Analytics by entering your tracking id
|
在Hugo站点根目录下新建模板文件(./layouts/_internal/google_analytics.html)并添加如下代码:
1
2
3
4
5
6
7
8
9
|
    <!-- Global Site Tag (gtag.js) - Google Analytics -->
    <script async src="https://www.googletagmanager.com/gtag/js?id={{ .Site.GoogleAnalytics }}"></script>
    <script>
      window.dataLayer = window.dataLayer || [];
      function gtag(){dataLayer.push(arguments);}
      gtag('js', new Date());

      gtag('config', '{{ .Site.GoogleAnalytics }}');
    </script>
|
引用Google Analytics模板。
在baseof.html基础模板文件中的head标签尾部添加如下代码, 这样站点发布到非Hugo Server后就会自动引用Google Analytics模板:
1
2
3
4
5
|
    <head>
    {{- if not .Site.IsServer }}
    	{{ template "_internal/google_analytics.html" . }}
    {{- end }}
    </head>
|